to select multiple slides in order, what must you press after selecting the first slide?
In PowerPoint, a placeholder is a pre-formatted container on a slide for content (text, graphics, or video). The pre-set formatting makes it easier to format slides consistently.
You format a placeholder in Slide Master view. Then yous use the placeholder—add together content to information technology—in Normal view.
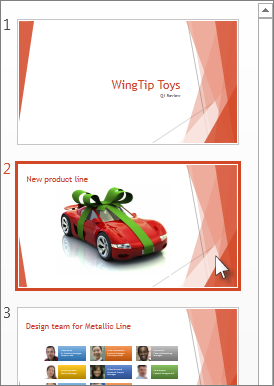
The pictured slide has two rectangular placeholders:
-
The (upper) Championship placeholder prompts the user for text and formats information technology in the default Heading font, size, and colour
-
The (lower) Content placeholder accepts text, or a table, nautical chart, SmartArt graphic, film, or video, every bit indicated by the clickable icons at its heart.

Change the prompt text in a placeholder
You can change the generic prompt text ("Click to edit ...") for a placeholder.
-
On the View tab, in the Master Views group, select Slide Master.
-
In slide master view, in the thumbnail pane, select the layout that you desire to revise.
-
In the primary pane, on the layout, select the current prompt text (such as Click to edit text, and then type the text you want to use instead.
-
When you consummate the changes in slide principal view, on the Slide Principal tab, select Close Master View to render to Normal view.
Tip:Modifications to the slide master and the corresponding slide layouts are temporarily added to the theme that is applied to your presentation. If y'all apply a unlike theme, then the slide main changes are discarded. If y'all want to keep the changes for future utilise, in the Edit Theme group, click Themes, and so click Save Electric current Theme.
Resize or reposition a placeholder
-
On the View tab, click Slide Chief.
-
On the slide layout that you desire alter, click the placeholder that yous want to alter, then practise one of the following:
-
To resize it, point to 1 of its sizing handles, and when the pointer becomes a ii-headed pointer
 , drag the handle.
 -
To reposition it, signal to one of its borders and when the pointer becomes a 4-headed arrow
 , elevate the placeholder to a new position.
-
-
On the Slide Chief tab, click Close Chief View.
-
In Normal View, in the thumbnail pane, select all the slides that employ the slide layout yous simply revised.
To select multiple slides, press and concord the Ctrl key, and and then click each slide.
-
On the Home tab, click Layout, and so select the layout that contains the placeholders that you just inverse.
This step finalizes the placeholder alter by reapplying the changed slide layout to an actual slide.
Add a placeholder to a slide layout
Placeholders tin can only be added to slide layouts, not individual slides in a presentation. If you oasis't worked with slide layouts, check out What is a slide layout? and What is a slide master? to learn more before reading on.
-
On the View tab, click Slide Main.
-
In the left thumbnail pane, click the slide layout that you desire to add i or more placeholders to.
-
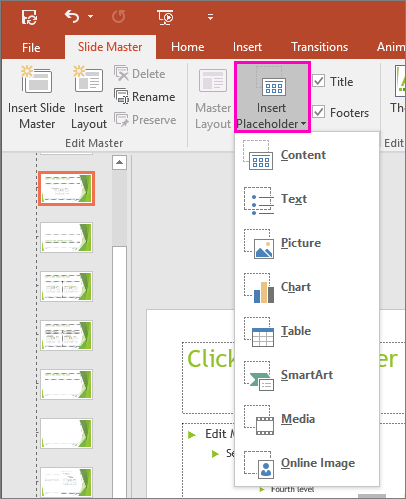
On the Slide Master tab, click Insert Placeholder, and and so click the blazon of placeholder that you desire to add.
-
Click a location on the slide layout, and so drag to draw the placeholder. You tin can add as many placeholders as you similar.
-
If yous add a text placeholder, you tin can customize the prompt text ("Click to edit ...") that appears in it:
Select the default text in the placeholder, and replace it with your own prompt text.
Switch to the Habitation tab to format the prompt text as you desire it to appear.
With the text selected, you can alter the Font or Font Size. If an unwanted bullet appears before your custom prompt text, in the Paragraph grouping, click the down arrow next to Bullets, and then click None.
-
When you're done, on the Slide Chief tab, click Shut Main View.
-
In Normal View, in the thumbnail pane, select all the slides that employ the slide layout you just revised.
(To select multiple slides, printing and hold the Ctrl fundamental, and then click each slide.)
-
On the Dwelling tab, click Layout, and then select the layout that contains the placeholders that you just inverse.
This step finalizes the placeholder change by reapplying the changed slide layout to an actual slide.
Remove a placeholder
Nosotros recommend that you don't remove a placeholder from a pre-built slide layout. If you want to make a change like that, duplicate that layout, give it a distinct name, then edit that copy.
-
On the View tab, click Slide Master.
-
In the left thumbnail pane, click the slide layout that you lot desire to revise.
-
Select the placeholder on the layout, then press the Delete key.
The following is an case of a congenital-in slide layout that contains a title text placeholder, two subtitle text placeholders, and ii placeholders to which you can add trunk text, a tabular array, nautical chart, SmartArt graphic, picture, or a moving picture or audio clip.

You tin add placeholders anywhere on a slide layout and add together custom prompt text to prompt your users to enter a sure type of content. You tin likewise customize the text for more specific prompts.
Important:If y'all revise a slide layout after y'all've already created some slides that use that layout, you must reapply the layout to the slides. See "Utilise the updates so that they appear on your slides" in the commodity, Edit and re-apply a slide layout.
-
On the View tab, in the Presentation Views group, click Slide Master.
-
In the pane that contains the slide masters and layouts, click the layout that y'all want to add one or more placeholders to.
-
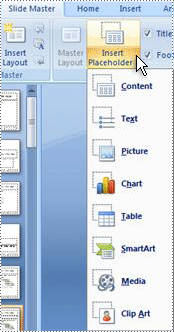
On the Slide Chief tab, in the Master Layout grouping, click Insert Placeholder, and then click the type of placeholder that you want.
-
Click a location on the layout, and and so elevate to draw the placeholder.
-
If you add a text placeholder, you can add custom text.
Highlight the default text in the placeholder, and replace information technology with your own prompt text.
Annotation:If an unwanted bullet appears earlier your custom prompt text, click the Abode tab, and in the Paragraph grouping, click the downwards arrow side by side to Bullets, and and so click None.
-
To add more placeholders to a layout, repeat steps 2 through iv.
Note:When you add placeholders to a layout, if the content in those placeholders changes the layout'due south purpose, you may besides desire to rename the layout. To do so, right-click the slide layout thumbnail, click Rename Layout, type a new proper noun, then click Rename.
-
On the Slide Master tab, in the Close group, click Close Main View to return to Normal view.
-
In the slide thumbnail list, select the slide that yous want to re-employ the layout with the newly-added placeholders to.
-
On the Home tab, in the Slides group, click Layout, and then click the revised layout.
Change the prompt text in a placeholder
You tin can replace the generic prompt text ("Click to edit ...") for a placeholder.
-
On the View menu, point to Chief Views, and then click Slide Primary.
-
In slide chief view, click the first slide layout beneath the slide chief in the navigation pane. (Slide layouts are below the slide master, which is the first detail in the navigation pane.)
-
Select the text Click to edit Chief championship style, and so blazon the custom text you'd like to supercede it with.
-
When you complete the changes in Slide Master view, on the Slide Master tab, click Close Primary to return to Normal (editing) view.
Tip:Modifications to the slide master and the respective slide layouts are temporarily added to the theme that is applied to your presentation. If you use a dissimilar theme, and so the slide master changes are discarded. If y'all want to go on the changes for hereafter apply, in the Edit Theme group, click Themes, and then click Salvage Current Theme.
Resize or reposition a placeholder
-
On the View tab, click Slide Master.
-
On the slide layout that y'all want change, click the placeholder that you desire to change, then do one of the following:
-
To resize information technology, point to ane of its sizing handles, and when the arrow becomes a two-headed arrow
, elevate the handle. -
To reposition it, point to one of its borders and when the arrow becomes a iv-headed arrow
, drag the placeholder to a new position.
-
-
On the Slide Master tab, click Close Principal View.
-
In Normal View, in the thumbnail pane, select all the slides that use the slide layout you just revised.
To select multiple slides, press and hold the Command primal ⌘, and then click each slide.
-
On the Home tab, click Layout, and so select the layout that contains the placeholders that yous merely changed.
This step finalizes the placeholder change by reapplying the changed slide layout to an bodily slide.
Add together placeholders to a slide layout
Placeholders are boxes on a slide layout that you click to add together content when you're creating your slides. In slide master view, yous can add placeholders to a new slide layout, or change the look of an existing slide layout.
-
On the View card, in the Master Views grouping, click Slide Main.
-
In the navigation pane, click the slide layout that y'all want to change. Slide layouts are below the slide principal, which is the pinnacle slide in the navigation pane.
-
In the Master Layout group, click the pointer next to Insert Placeholder, and then click the blazon of placeholder you lot want to insert. Options are for Content, Content (Vertical), Text, Text (Vertical), Picture, Chart, Table, SmartArt, Media, and Online Image.

-
On the slide, drag your cursor to describe the placeholder on the slide.
-
Do whatsoever of the following:
To
Practise this
Resize the placeholder
Select the placeholder, position the pointer over a sizing handle, and and then drag the handle until the placeholder is the size that you want.
Move the placeholder
Select the placeholder, and and then drag information technology to its new location.
Format the placeholder
Select the placeholder, click the Shape Format tab, so brand the changes that you desire. For example, to change the fill color of the placeholder, in Shape Styles, click Shape Fill up.
-
When you consummate the changes in slide primary view, on the Slide Principal tab, click Close Master to render to normal view.
Tip:Modifications to the slide primary and the corresponding slide layouts are temporarily added to the theme that is practical to your presentation. If you apply a dissimilar theme, and then the slide main changes are discarded. If y'all want to keep the changes for future use, in the Edit Theme group, click Themes, and then click Salve Current Theme.
-
In Normal View, in the thumbnail pane, select all the slides that use the slide layout you lot just revised.
(To select multiple slides, press and concord the Control key ⌘, and and so click each slide.)
-
On the Habitation tab, click Layout, and then select the layout that contains the placeholders that you only inverse.
This step finalizes the placeholder alter by reapplying the changed slide layout to an actual slide.
Remove footer elements from a slide layout
The footer placeholders are included by default when you add together a new slide layout. The footer is made up of 3 elements: appointment and time, footer text, and slide number. The formatting, size, and position of the footer placeholders are inherited from the footer elements on the slide main, except if you edit the footer placeholder directly on the slide layout.
Important:Even if the footer elements are represented on the slide main and slide layouts in slide master view, you must turn them on before they can appear on the slides of your presentation. To turn on headers and footers, click the Insert menu, and then click Header and Footer.
-
On the View card, point to Master Views, and then click Slide Master.
-
In the navigation pane, click the slide layout that you want to change. Slide layouts are below the slide master, which is the top slide in the navigation pane.
-
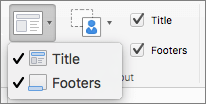
In the Slide Master tab, in the Primary Layout, clear the Footers check box.
-
When yous complete the changes in slide master view, on the message bar click Close Master to render to normal view.
Tip:Modifications to the slide master and the respective slide layouts are temporarily added to the theme that is practical to your presentation. If you lot use a dissimilar theme, so the slide main changes are discarded. If yous want to keep the changes for future utilise, in the Edit Theme group, click Themes, then click Salvage Current Theme.
Add together placeholders to a slide layout
Placeholders are boxes on a slide layout that you click to add content when you lot're creating a presentation. In slide master view, yous can add together placeholders to a new slide layout, or change the look of an existing slide layout.
-
On the View bill of fare, point to Master, so click Slide Primary.
-
In the navigation pane, click the slide layout that you want to modify. Slide layouts are below the slide master, which is the elevation slide in the navigation pane.
-
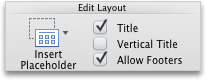
Click the Slide Master tab, and and so under Edit Layout, do whatsoever of the post-obit:
To insert placeholder for
Practice this
Title
Annotation:Simply one "official" title placeholder is allowed on each slide because the text that you lot add to a title placeholder in normal view becomes the slide title in the outline.
Select the Title check box.
Vertical Championship
Note:Only one "official" championship placeholder is allowed on each slide because the text that you add to a title placeholder in normal view becomes the slide title in the outline.
Select the Vertical Title check box.
content placeholder
Click the arrow adjacent to Insert Placeholder, then click Content
 .
.Vertical Content
Click the arrow next to Insert Placeholder, and then click Vertical Content
 .
.Text
Click the arrow next to Insert Placeholder, and and then click Text
 .
.Vertical Text
Click the arrow next to Insert Placeholder, and then click Vertical Text
 .
.Chart
Click the arrow adjacent to Insert Placeholder, and then click Chart
 .
.Table
Click the pointer next to Insert Placeholder, and then click Tabular array
 .
.SmartArt graphic
Click the arrow next to Insert Placeholder, and and then click SmartArt Graphic
 .
.Movies
Click the arrow side by side to Insert Placeholder, and so click Media
 .
.Clip Art
Click the arrow next to Insert Placeholder, and and then click Clip Art
 .
.Picture
Click the arrow adjacent to Insert Placeholder, and then click Flick
 .
. -
On the slide, elevate your cursor to draw the placeholder on the slide.
-
Practise any of the following:
To
Do this
Resize the placeholder
Select the placeholder, position the pointer over a sizing handle, and and then elevate the handle until the placeholder is the size that you want.
Move the placeholder
Select the placeholder, and so elevate it to its new location.
Format the placeholder
Select the placeholder, click the Format tab, so make the changes that yous want. For example, to modify the fill color of the placeholder, nether Shape Styles, click Fill.
-
When yous complete the changes in slide master view, on the bulletin bar click Close Principal to render to normal view.
Tip:Modifications to the slide primary and the respective slide layouts are temporarily added to the theme that is applied to your presentation. If you apply a different theme, and then the slide master changes are discarded. If you want to keep the changes for futurity use, on the Themes tab, nether Themes, click Salvage Theme.
Replace the prompt text in a placeholder
If you are creating a template and want to provide specific instructions for what content should be added to a placeholder on a slide, you can supervene upon the prompt text in slide master view. In the following example "Click to add together project title" replaces the default prompt text in a title placeholder.
-
On the View bill of fare, point to Primary, and then click Slide Primary.
-
In slide master view, click the first slide layout below the slide chief in the navigation pane. Slide layouts are below the slide master which is the summit slide in the navigation pane.
-
To supervene upon the placeholder text, select the text Click to edit Main title style, and then type or paste the custom text, Click to add projection title.
The placeholder text changes to Click to add project title, and you see this new prompt text in the placeholder when you lot render to normal view.
-
When yous complete the changes in slide master view, on the message bar click Shut Main to return to normal view.
Tip:Modifications to the slide master and the corresponding slide layouts are temporarily added to the theme that is applied to your presentation. If yous use a dissimilar theme, then the slide main changes are discarded. If you lot want to keep the changes for hereafter utilize, on the Themes tab, under Themes, click Save Theme.
Remove footer elements from a slide layout
The footer placeholders are included past default when you add a new slide layout. The footer is fabricated up of 3 elements: date and time, footer text, and slide number. The formatting, size, and position of the footer placeholders are inherited from the footer elements on the slide chief, except if you edit the footer placeholder directly on the slide layout.
Important:Even if the footer elements are represented on the slide master and slide layouts in slide master view, yous must plough them on earlier they can announced on the slides of your presentation. To plough on headers and footers, click the Insert menu, and and then click Header and Footer.
-
On the View menu, point to Master, then click Slide Master.
-
In the navigation pane, click the slide layout that you want to alter. Slide layouts are below the slide master, which is the top slide in the navigation pane.
-
Click the Slide Master tab, so under Edit Layout, clear the Allow Footers bank check box.
-
When you complete the changes in slide master view, on the message bar click Shut Master to return to normal view.
Tip:Modifications to the slide primary and the corresponding slide layouts are temporarily added to the theme that is applied to your presentation. If you use a different theme, then the slide main changes are discarded. If y'all want to keep the changes for future employ, on the Themes tab, under Themes, click Save Theme.
Come across Too
Create or modify slide layouts
Change a slide master
Source: https://support.microsoft.com/en-us/office/add-edit-or-remove-a-placeholder-on-a-slide-layout-a8d93d28-66cb-43fd-9f9d-e12d0a7a1f06
0 Response to "to select multiple slides in order, what must you press after selecting the first slide?"
Postar um comentário